Portrait Retouching Tip: Fix Shiny Skin in Photoshop & Lightroom
Figuration: Tutorial
Description
It’s summer time… you shoot a wedding or an outdoor portrait and because of the heat your subject has shiny skin or your new to lighting and haven’t quite perfected things yet and you have a great shot – but your subjects skin is shiny – it's easy to fix in post-production.
A few quick reminders… FIX it in post is NEVER the best solution – so as you are practicing and learning your craft – ALWAYS strive to get it right in camera.
Also – if you are doing portraits or headshots or modeling shots and you want to up your game – lighting is just a piece of the puzzle – you need to find a great makeup artist to get your images to a pro level.
Ok – to the retouching tip…
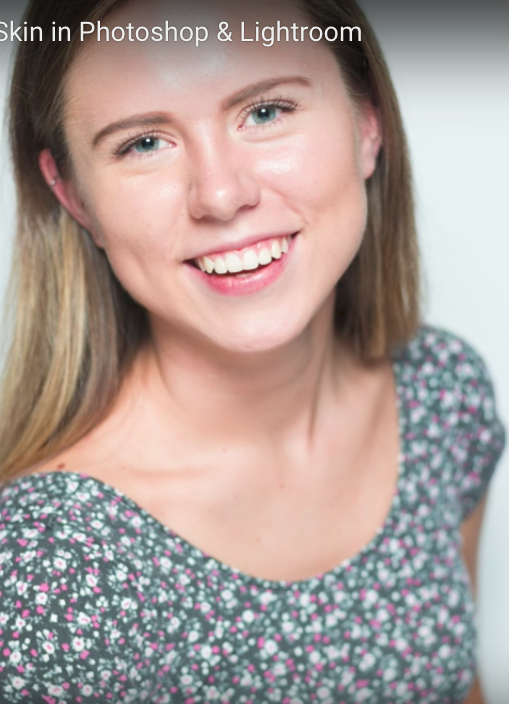
Here is a great portrait that was posted in my Facebook group by Stig-Arve Holmem from Norway. We have a very young subject with lots of personality but no makeup artist and the image is just slightly over exposed, so we wind up with shiny skin in the forehead, nose and tops of the cheeks.
So do we scrap the image? Heck no – it’s a great shot and easily repaired.
LINKS MENTIONED IN THIS VIDEO
https://www.facebook.com/groups/ispphotographers
SUBSCRIBE to learn how to improve your photography!
http://tog.chat/ytsubscribe
PATREON: Let's support each other! http://tog.chat/patreon
or donate via PayPal: http://tog.chat/paypal
SHOP FOR TOGSWAG℠
http://www.togswag.com
SIGN UP FOR MY EMAIL NEWSLETTER
http://tog.chat/newsletter
MY WEBSITE
http://www.JoeEdelman.com
MY BLOG
http://www.joeedelman.photography
MODELS SHOULD VISIT
http://www.ModelingTip.com
LET'S CONNECT!
- Like & Follow on FACEBOOK: http://tog.chat/facebook
- Follow on TWITTER: http://tog.chat/twitter
- Follow on INSTAGRAM: http://tog.chat/instagram
- Check my boards on PINTEREST: http://tog.chat/pinterest
- Connect on LINKEDIN: http://tog.chat/linkedin
- Connect on GOOGLE+: http://tog.chat/googleplus
FTC Disclosure: No sponsors have paid for or provided equipment or material shown in this video
Metadata
| Video ID | 161 | Youtube URL | Portrait Retouching Tip: Fix Shiny Skin in Photoshop & Lightroom |
|---|---|
| Captions Available | Yes |
| Captions Downloadable | Yes |
| Playlists | |
| Duration | 00:04:08 |
| Definition | hd |
| Keywords | |
| License | youtube |
| Embeddable | Yes |
| Views | 46018 |
| Likes | 806 |
| Dislikes | 11 |
| Favourites | 0 |
| Comments | 76 |
| Created | 2017-05-04 1:00:43 PM |
| Updated | 2017-05-04 1:11:40 PM |
Captions
ASR: en
0:00:00.000,0:00:02.030
I
0:00:03.970,0:00:09.260
it's summertime you shoot a wedding or
0:00:07.189,0:00:12.650
an outdoor portrait and because of the
0:00:09.260,0:00:14.509
heat your subject has shiny skin or your
0:00:12.650,0:00:16.370
noodle lighting and you haven't quite
0:00:14.509,0:00:18.859
perfected things yet and you have a
0:00:16.370,0:00:21.560
great shot but your subject skin is
0:00:18.859,0:00:25.699
shiny it's actually really easy to fix
0:00:21.560,0:00:29.150
in post production a few quick reminders
0:00:25.699,0:00:31.699
fix it in post is never the best
0:00:29.150,0:00:34.070
solution so as you're practicing and
0:00:31.699,0:00:36.890
you're learning your craft always strive
0:00:34.070,0:00:38.720
to get it right in-camera and also if
0:00:36.890,0:00:40.790
you're doing portraits or head shots or
0:00:38.720,0:00:43.490
modeling shots and you really want up
0:00:40.790,0:00:46.070
your game lighting is just a piece of
0:00:43.490,0:00:48.590
the puzzle you need to find a really
0:00:46.070,0:00:50.930
great makeup artist to get really great
0:00:48.590,0:00:53.960
images and move your work to the pro
0:00:50.930,0:00:55.880
level ok the retouching tip here is a
0:00:53.960,0:00:58.430
great portrait that was posted in my
0:00:55.880,0:01:01.190
facebook group by stig holman from
0:00:58.430,0:01:03.680
norway we have a very pretty young
0:01:01.190,0:01:05.780
subject with lots of personality but no
0:01:03.680,0:01:08.240
makeup artist and the image is just
0:01:05.780,0:01:10.670
slightly overexposed so we wind up with
0:01:08.240,0:01:13.039
shiny skin on the forehead the nose and
0:01:10.670,0:01:16.039
the tops of the cheeks so do we scrap
0:01:13.039,0:01:19.039
this image heck no it's a great shot and
0:01:16.039,0:01:21.049
it's easily repaired so let's start with
0:01:19.039,0:01:23.780
Photoshop I've already taken care of
0:01:21.049,0:01:26.659
exposure contrast color etc in the
0:01:23.780,0:01:29.030
camera raw panel all I need to do now is
0:01:26.659,0:01:31.579
create a blank layer if you're a little
0:01:29.030,0:01:34.490
OCD and like to label your layers will
0:01:31.579,0:01:36.619
call this one shine now I'm going to use
0:01:34.490,0:01:38.960
the eyedropper to sample the skin color
0:01:36.619,0:01:41.630
right next to this large area of shine
0:01:38.960,0:01:43.819
on the subjects forehead then I'll
0:01:41.630,0:01:47.299
select my brush tool I'm going to keep
0:01:43.819,0:01:49.759
it a very soft brush with 0% hardness
0:01:47.299,0:01:52.100
I'll also change the blending mode of
0:01:49.759,0:01:56.179
the brush to darken and set the opacity
0:01:52.100,0:01:57.859
down around fifteen percent adjust your
0:01:56.179,0:02:00.259
brush size to cover the area you're
0:01:57.859,0:02:02.590
working on and simply brush over the
0:02:00.259,0:02:02.590
shine
0:02:04.810,0:02:12.680
and there it goes this also works just
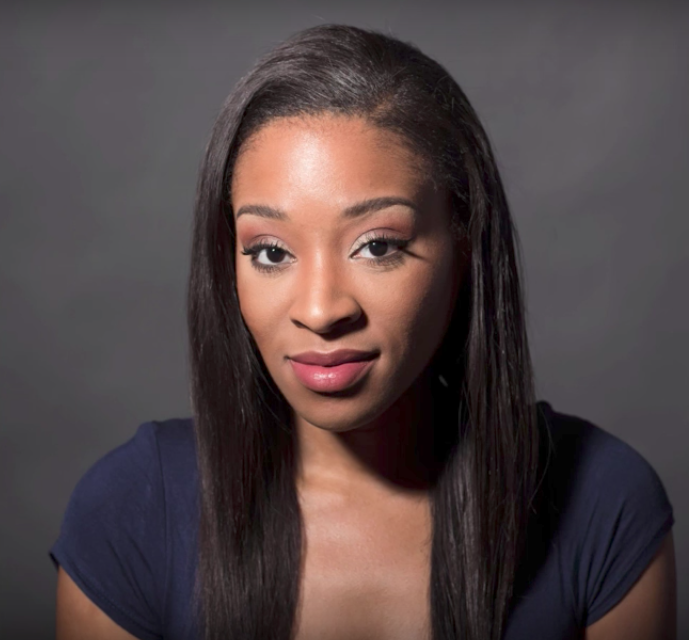
0:02:10.489,0:02:15.319
as effectively on dark skin as you can
0:02:12.680,0:02:17.209
see in this shot taken with direct flash
0:02:15.319,0:02:19.810
from my recent video about light
0:02:17.209,0:02:19.810
modifiers
0:02:20.060,0:02:24.319
now I know that some of you have not
0:02:22.400,0:02:26.000
made the jump to photo shop yet and
0:02:24.319,0:02:28.970
you're working strictly in Lightroom
0:02:26.000,0:02:30.860
that's okay there is a fixed for shiny
0:02:28.970,0:02:33.430
skin that works very well in Lightroom
0:02:30.860,0:02:35.660
it just takes a little more effort in
0:02:33.430,0:02:38.120
Lightroom we're going to use the Spot
0:02:35.660,0:02:40.180
Healing tool to eliminate the shine but
0:02:38.120,0:02:42.830
we need to finesse it just a little bit
0:02:40.180,0:02:45.349
so as I bring Stig's portrait up in the
0:02:42.830,0:02:47.269
developed panel of Lightroom I'll select
0:02:45.349,0:02:49.400
the spot healing tool and the first
0:02:47.269,0:02:52.730
thing I'll do is set the feathering to
0:02:49.400,0:02:55.190
somewhere between 70 and 90 just like
0:02:52.730,0:02:58.640
with Photoshop we want a very soft brush
0:02:55.190,0:03:00.860
I'll leave the opacity at 100 for now
0:02:58.640,0:03:03.950
and adjust my brush size to match the
0:03:00.860,0:03:05.209
area that I want to work on now I'll go
0:03:03.950,0:03:07.280
ahead and I'll brush over the shine that
0:03:05.209,0:03:09.799
I want to remove and you can see that
0:03:07.280,0:03:12.319
lightroom auto magically selects the
0:03:09.799,0:03:14.269
similar area to sample now this may be
0:03:12.319,0:03:17.269
too much so all you need to do to
0:03:14.269,0:03:19.549
finesse this is adjust the opacity until
0:03:17.269,0:03:21.349
you get the desired look it takes a
0:03:19.549,0:03:24.049
little more effort it's not quite as
0:03:21.349,0:03:27.590
fast as in Photoshop but it works very
0:03:24.049,0:03:31.400
well and yes it works equally as well on
0:03:27.590,0:03:33.739
darker skin so there you have it a quick
0:03:31.400,0:03:37.190
and easy solution to remove unwanted
0:03:33.739,0:03:40.090
shine in both Photoshop and Lightroom so
0:03:37.190,0:03:44.959
go practice and until next time remember
0:03:40.090,0:03:48.100
your best shot is your next shot so keep
0:03:44.959,0:03:51.859
learning keep thinking and keep shooting
0:03:48.100,0:03:53.900
adios thanks for watching if you find
0:03:51.859,0:03:55.970
these videos helpful please give them a
0:03:53.900,0:03:58.519
thumbs up and subscribe so that you
0:03:55.970,0:03:59.959
don't miss a single episode and if
0:03:58.519,0:04:01.850
you've got a question that you'd like
0:03:59.959,0:04:05.060
answered post it in the comments section
0:04:01.850,0:04:07.359
below your question could be my next
0:04:05.060,0:04:07.359
video
standard: es
1
00:00:04,674 --> 00:00:06,028
El verano está aquí
2
00:00:06,232 --> 00:00:08,270
tomas fotografías de una boda o un retrato en exteriores
3
00:00:08,323 --> 00:00:09,676
y por causa del calor
4
00:00:09,728 --> 00:00:11,842
tu sujeto tiene la piel brillante
5
00:00:12,046 --> 00:00:15,756
o eres nuevo en iluminación y no la has perfeccionado aún
6
00:00:15,884 --> 00:00:19,594
y tienes una gran toma, pero la piel de tu sujeto está brillante.
7
00:00:19,798 --> 00:00:22,862
Es algo muy fácil de arreglar en post-producción.
8
00:00:22,990 --> 00:00:24,116
"Recuerda"
9
00:00:24,282 --> 00:00:26,016
Algunos recordatorios
10
00:00:26,258 --> 00:00:28,030
"arréglalo en post"
11
00:00:28,196 --> 00:00:30,014
nunca es la mejor solución
12
00:00:30,248 --> 00:00:32,970
así que mientras practicas y aprendes tu oficio
13
00:00:33,174 --> 00:00:35,896
siempre esfuérzate por hacerlo bien con la cámara.
14
00:00:36,138 --> 00:00:39,582
Y también, si haces retratos, tomas frontales o tomas de modelaje
15
00:00:39,786 --> 00:00:41,520
y quieres mejorar tus resultados
16
00:00:41,800 --> 00:00:44,180
la iluminación es sólo una pieza del rompecabezas.
17
00:00:44,460 --> 00:00:47,448
Necesitas encontrar un maquillador realmente bueno
18
00:00:47,576 --> 00:00:49,120
para obtener imágenes realmente buenas
19
00:00:49,172 --> 00:00:51,628
y elevar tu trabajo a un nivel profesional.
20
00:00:51,756 --> 00:00:53,414
OK el consejo de retoque.
21
00:00:53,656 --> 00:00:56,986
Este es un gran retrato publicado en mi grupo de Facebook
22
00:00:57,076 --> 00:00:59,363
por Stig-Arve Holmem de Noruega.
23
00:00:59,698 --> 00:01:03,066
Tenemos un sujeto bastante joven con mucha personalidad
24
00:01:03,232 --> 00:01:04,738
peros sin maquillador.
25
00:01:04,904 --> 00:01:07,170
La imagen está un poco sobre expuesta
26
00:01:07,298 --> 00:01:09,868
así que obtuvimos una piel brillante en la frente
27
00:01:10,034 --> 00:01:12,164
la nariz y mejillas.
28
00:01:12,276 --> 00:01:13,744
¿Entonces descartamos esta imagen?
29
00:01:13,796 --> 00:01:17,734
¡Claro que no! Es una gran toma y fácil de reparar.
30
00:01:18,052 --> 00:01:20,052
Empecemos con Photoshop
31
00:01:20,142 --> 00:01:24,840
ya corregí la exposición, contraste, color en el panel "Camera Raw"
32
00:01:25,348 --> 00:01:28,336
todo lo que necesito hacer es crear una capa en blanco
33
00:01:28,464 --> 00:01:31,218
si eres algo obsesivo y te gusta marcar tus capas
34
00:01:31,314 --> 00:01:33,314
llamaremos esta "Shine"
35
00:01:33,708 --> 00:01:36,694
Ahora usaré el "eyedropper" para seleccionar el color de la piel
36
00:01:36,786 --> 00:01:40,648
justo después de esta gran área de brillo en la frente del sujeto.
37
00:01:41,118 --> 00:01:43,118
Luego selecciono el color del pincel.
38
00:01:43,474 --> 00:01:47,792
Voy a usar un pincel bastante suave con dureza del 0%.
39
00:01:47,958 --> 00:01:51,326
También cambiaré el mezclado del pincel a más oscuro
40
00:01:51,378 --> 00:01:54,900
y bajaré la opacidad alrededor del 15%.
41
00:01:55,444 --> 00:01:58,850
Ajusta el tamaño del pincel para cubrir el área en la que trabajas
42
00:01:58,902 --> 00:02:01,322
y simplemente pintar sobre la parte brillante.
43
00:02:07,034 --> 00:02:08,844
¡Y ahí lo tienen!
44
00:02:09,048 --> 00:02:12,036
Funciona igual de bien en pieles más oscuras
45
00:02:12,240 --> 00:02:15,535
como pueden ver en esta imagen tomada con flash directo
46
00:02:15,622 --> 00:02:18,074
de mi reciente video sobre modificaciones en la iluminación.
47
00:02:20,486 --> 00:02:24,158
Sé que muchos de ustedes no han hecho el salto a Photoshop aún
48
00:02:24,248 --> 00:02:26,248
y trabajan únicamente con Lightroom.
49
00:02:26,604 --> 00:02:30,960
Eso está bien, hay una herramienta para la piel brillante que funciona muy bien en Lightroom
50
00:02:31,240 --> 00:02:33,468
sólo se necesita un poco más de trabajo.
51
00:02:33,748 --> 00:02:37,496
En Lightroom vamos a usar la herramienta "spot healing" para eliminar el brillo
52
00:02:37,890 --> 00:02:40,346
pero tenemos que refinarla un poco.
53
00:02:40,854 --> 00:02:44,576
Al traer el retrato de Stig en el panel de desarrollo de Lightroom
54
00:02:44,672 --> 00:02:49,276
selecciono la herramienta "spot healing" y lo primero que hago es ajustar el "feathering"
55
00:02:49,366 --> 00:02:51,771
entre 70 y 90.
56
00:02:52,254 --> 00:02:55,584
Al igual que en Photoshop, queremos un pincel muy suave.
57
00:02:56,130 --> 00:02:58,776
Dejaré la opacidad en 100 por ahora
58
00:02:58,866 --> 00:03:02,710
y ajusto el tamaño del pincel según el tamaño del área donde trabajaré.
59
00:03:03,388 --> 00:03:06,452
Ahora pintaré el brillo que quiero eliminar
60
00:03:06,656 --> 00:03:11,582
y puedes ver cómo Lightroom selecciona un área similar a la muestra.
61
00:03:11,748 --> 00:03:15,382
Esto podría ser demasiado, así que todo lo que hay que hacer para refinarlo
62
00:03:15,472 --> 00:03:18,954
es ajustar la opacidad hasta obtener el resultado deseado.
63
00:03:19,044 --> 00:03:22,640
Requiere un poco más de trabajo, y no es tan fantástico como Photoshop
64
00:03:22,730 --> 00:03:24,730
pero funciona muy bien.
65
00:03:25,162 --> 00:03:29,024
Y sí, funciona igual de bien en piel más oscura.
66
00:03:29,532 --> 00:03:34,344
Así que ahí lo tienen, una solución rápida y fácil para eliminar el brillo no deseado
67
00:03:34,472 --> 00:03:36,890
usando Photoshop y Lightroom.
68
00:03:37,056 --> 00:03:40,652
Así que practiquen, hasta la próxima y recuerden...
69
00:03:40,856 --> 00:03:43,920
su mejor toma es su siguiente toma.
70
00:03:44,200 --> 00:03:48,214
Así que sigan aprendiendo, sigan pensando, y sigan fotografiando.
71
00:03:48,608 --> 00:03:49,816
¡Adiós!
72
00:03:50,318 --> 00:03:53,002
Gracias por verme, si te ayudó este video
73
00:03:53,130 --> 00:03:55,472
por favor, dame tus pulgares arriba y suscríbete
74
00:03:55,600 --> 00:03:58,004
así no te perderás ningún episodio.
75
00:03:58,184 --> 00:04:00,564
Y si tienes preguntas y quieres respuestas
76
00:04:00,692 --> 00:04:02,692
déjalas en la sección de comentarios
77
00:04:03,048 --> 00:04:05,808
tu pregunta podría ser mi próximo video.
Screenshots

Profiles
Profile 1
| Purpose | Tutorial (why) |
|---|---|
| Content | |
| Participants | nameless (f) model, Photoshop (m) geek, Audience |
| Form | Tutorial (how) |
| Time | |
| Place |
Profile 2
| Purpose | Tutorial |
|---|---|
| Content | Portrait |
| Participants | nameless (f) model, Photoshop geek |
| Form | Mid shot |
| Time | Real time |
| Place | Desktop |
Profile 4
| Purpose | |
|---|---|
| Content | Portrait |
| Participants | |
| Form | |
| Time | |
| Place |